Honda Civic Service Manual: Side Impact Sensor (Second) Removal and Installation (2-door)
7521C3 LEFT REAR
7521C4 RIGHT REAR

Removal
|
NOTE: SRS components are located in this area. Review the SRS
component locations and the precautions and procedures before doing
repairs or service.
|
| 1. |
Battery Terminal (SRS) - Disconnection |
|
|
|
1.
|
Make sure the ignition switch is in LOCK (0).
|
|
2.
|
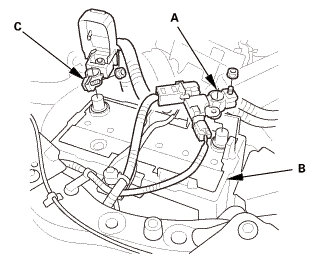
Disconnect and isolate the negative cable and battery
sensor (A) from the battery (B).
|
|
NOTE: Always disconnect the negative side first.
|
|
3.
|
Disconnect the positive cable (C) from the battery.
|
|
4.
|
Wait at least 3 minutes before starting work.
|
|
|
|
|
1.
|
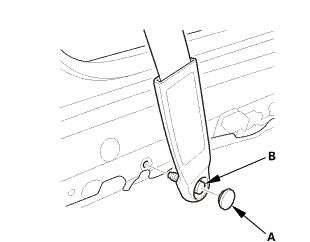
Driver's side: Remove the lower anchor cap (A).
|
|
2.
|
Driver's side: Remove the lower anchor bolt (B).
|
|
|
|
|
3.
|
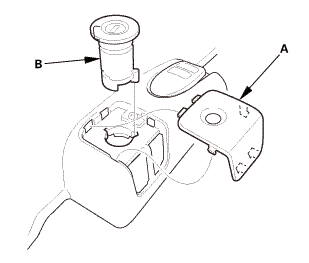
Driver's side: Remove the cap (A).
|
|
4.
|
Driver's side: Remove the opener lock cylinder (B).
|
|
|
|
|
5.
|
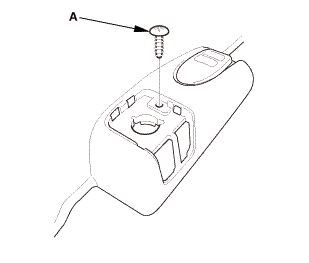
Driver's side: Remove the screw (A).
|
|
|
Driver's side
Passenger's side
|
|
6.
|
Remove the front door sill trim (A).
|
|
|
|
|
1.
|
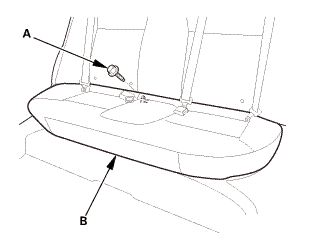
Remove the bolt (A) securing the rear seat cushion (B).
|
|
|
|
|
2.
|
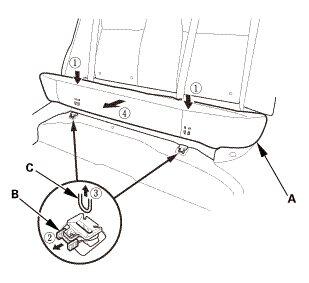
While pushing down the rear seat cushion (A), pull the
seat hook handles (B) to release the hooks (C).
|
|
3.
|
Remove the rear seat cushion.
|
|
| 4. |
Rear Seat-Back - Fold Down |
|

|
|
1.
|
Remove the rear seat-back (A).
|
|
| 5. |
Right Rear Seat-Back - Split Fold Down |
|
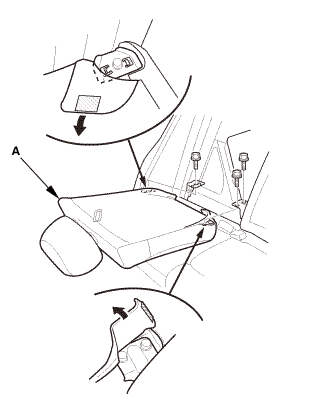
|
|
1.
|
Remove the right rear seat-back (A).
|
|
| 6. |
Center Pivot Bracket - Split Fold Down |
|
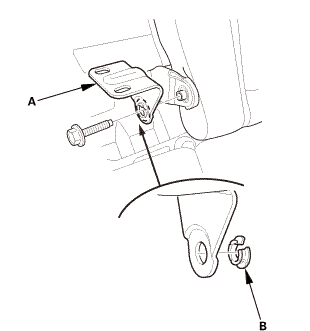
|
|
1.
|
Remove the center pivot bracket (A).
|
|
2.
|
If necessary, remove the bushing (B).
|
|
| 7. |
Left Rear Seat-Back - Split Fold Down |
|
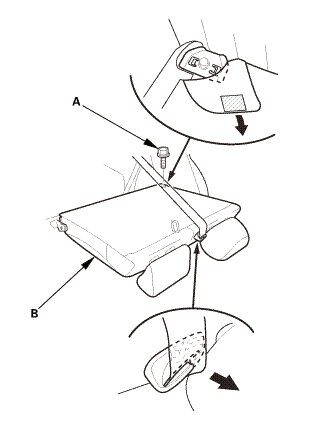
|
|
1.
|
Remove the bolt (A) securing the left rear seat-back
(B).
|
|
|
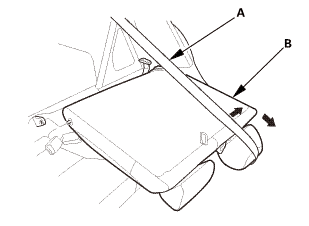
|
|
2.
|
Extend the center seat belt (A), then remove the left
rear seat-back (B).
|
|
| 8. |
Both Quarter Pillar Trims |
|

|
|
1.
|
Remove the cap (A) and the clip (B).
|
|
2.
|
The left side is shown; repeat on the right side.
|
|
|

|
|
3.
|
Lower the coat hanger hook (A), then remove the screw
(B).
|
|
4.
|
The left side is shown; repeat on the right side.
|
|
|

|
|
5.
|
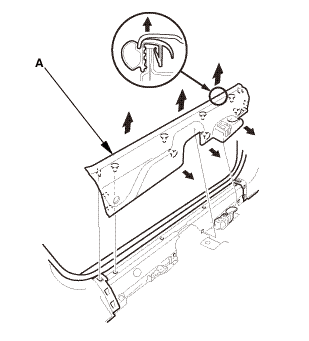
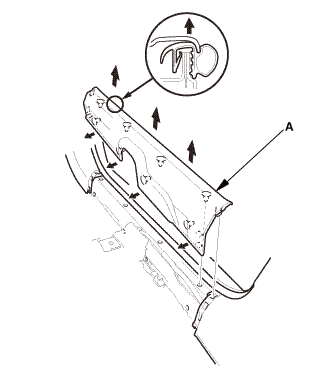
Pull out the quarter pillar trim (A) to release the clips.
|
|
6.
|
Remove the quarter pillar trim.
|
|
NOTE: The rear clip (B) will stay in the body.
|
|
7.
|
The left side is shown; repeat on the right side.
|
|
|

|
|
8.
|
Remove the rear clip (A).
|
|
9.
|
The left side is shown; repeat on the right side.
|
|
|

|
|
1.
|
Fold down the seat-back(s).
|
|
2.
|
From the trunk compartment, disconnect the connector
(A).
|
|
|

|
|
3.
|
From the trunk compartment, detach the clips (A).
|
|
|

|
|
4.
|
Release the hooks (A).
|
|
|

|
|
5.
|
Pull out both rear seat belts (A) and the rear center
seat belt (B) through the slits in the rear shelf trim (C),
then remove the rear shelf trim.
|
|
|

|
|
1.
|
Remove the rear side trim panel (A).
|
|
| 11. |
Side Impact Sensor (Second) |
|

|
|
1.
|
Disconnect the side impact sensor (second) connector
on the floor wire harness.
|
|
2.
|
Remove the TORX bolt using a TORX T30 bit, then remove
the side impact sensor (second) (A).
|
|

Installation
|
NOTE: SRS components are located in this area. Review the SRS
component locations and the precautions and procedures before doing
repairs or service.
|
| 1. |
Side Impact Sensor (Second) |
|

|
|
1.
|
Install the side impact sensor (second) (A) with the
new TORX bolt using a TORX T30 bit.
|
|
2.
|
Connect the side impact sensor (second) connector on
the floor wire harness.
|
|
| 2. |
Battery Terminal (SRS) - Reconnection |
|
 (o.2ao.sam. (o.2ao.sam.
|
|
NOTE: If the battery performs abnormally, test the battery.
|
|
1.
|
Clean the battery terminals.
|
|
2.
|
Connect the positive cable (A) to the battery (B).
|
|
NOTE: Always connect the positive side first.
|
|
3.
|
Connect the negative cable and battery sensor (C) to
the battery.
|
|
4.
|
Apply multipurpose grease to the terminals to prevent
corrosion.
|
|
|
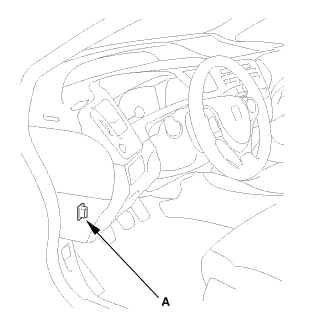
|
|
1.
|
Connect the HDS to the data link connector (DLC) (A)
located under the driver's side of the dashboard.
|
|
2.
|
Turn the ignition switch to ON (II).
|
|
3.
|
Make sure the HDS communicates with the vehicle. If it
does not communicate, go to the DLC circuit troubleshooting.
|
|
|
|
1.
|
Clear the DTC(s) by following the screen prompts on the
HDS.
|
|
2.
|
Turn the ignition switch to LOCK (0), then wait for 10
seconds.
|
|
| 5. |
Confirm Proper SRS Operation |
|
|
Turn the ignition switch to ON (II), and check that the
SRS indicator comes on for about 6 seconds and then goes
off.
|
|
|

|
|
1.
|
Install the rear side trim panel (A).
|
|
|

|
|
1.
|
Slip the rear seat belts (A) and the rear center seat
belt (B) through the slits in the rear shelf trim (C).
|
|
|

|
|
2.
|
Install the hooks (A).
|
|
|

|
|
3.
|
Install the clips (A).
|
|
|

|
|
4.
|
From the trunk compartment, connect the connector (A).
|
|
5.
|
Raise the seat-back(s).
|
|
| 8. |
Both Quarter Pillar Trims |
|

|
|
1.
|
Install the new rear clip (A) to the quarter pillar trim
(B).
|
|
|

|
|
2.
|
Fit the clips into the holes in the quarter pillar.
|
|
3.
|
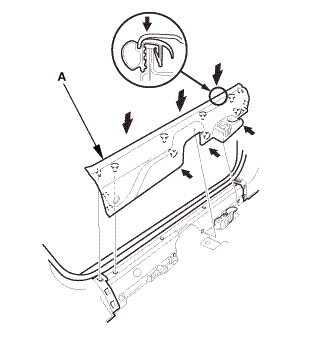
Lightly push the quarter pillar trim (A) into place,
then install the trim.
|
|
NOTE:
|
|

|
Make sure the side curtain airbag is
not tucked under the clips or the ribs.
|
|
|

|
Do not push too hard on the quarter pillar
trim. If you push too hard, the clip will
be damaged, and it will not hold the trim
properly.
|
|
|

|
Gently tug on the quarter pillar trim
to verify that all clips are securely fastened.
|
|
|
|
|

|
|
4.
|
Install the screw (A).
|
|
|

|
|
5.
|
Install the clip (A) and the cap (B).
|
|
| 9. |
Left Rear Seat-Back - Split Fold Down |
|
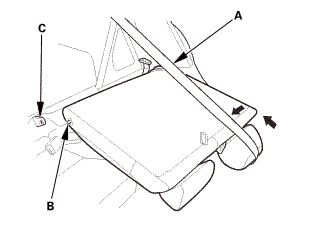
|
|
1.
|
Extend the center seat belt (A), then install the pivot
shaft (B) to the center pivot bracket (C).
|
|
|
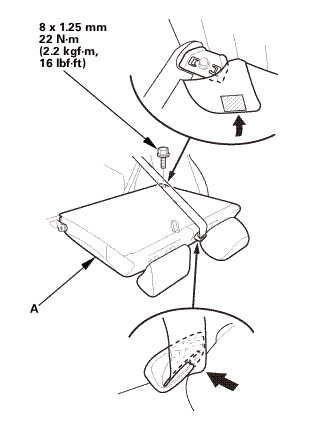
|
|
2.
|
Install the left rear seat-back (A).
|
|
| 10. |
Center Pivot Bracket - Split Fold Down |
|
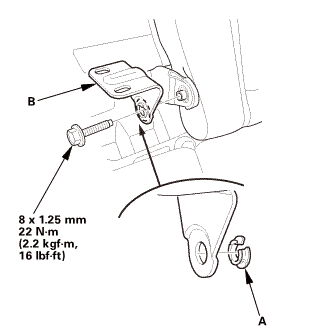
|
|
1.
|
If necessary, install the bushing (A).
|
|
2.
|
Install the center pivot bracket (B).
|
|
| 11. |
Right Rear Seat-Back - Split Fold Down |
|
|
|
1.
|
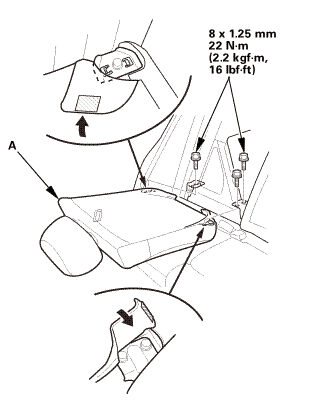
Install the right rear seat-back (A).
|
|
| 12. |
Rear Seat-Back - Fold Down |
|

|
|
1.
|
Install the rear seat-back (A).
|
|
|
|
|
1.
|
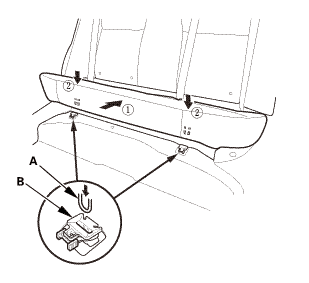
Install the hooks (A) to the rear seat cushion clips
(B).
|
|
|
|
|
2.
|
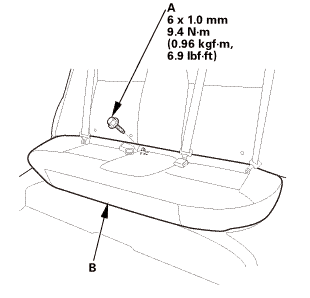
Install the bolt (A) securing the rear seat cushion (B).
|
|
|
Driver's side
Passenger's side
|
|
1.
|
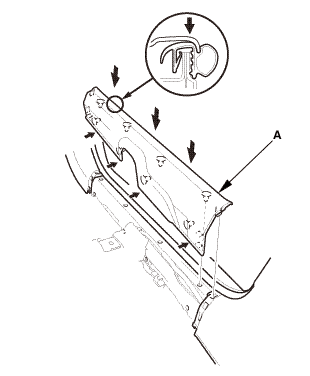
Install the front door sill trim (A).
|
|
|
|
|
2.
|
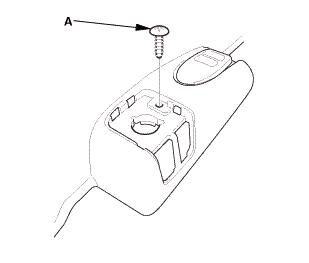
Driver's side: Install the screw (A).
|
|
|
|
|
3.
|
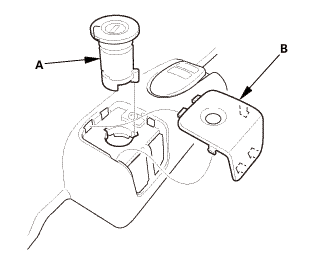
Driver's side: Install the opener lock cylinder (A).
|
|
4.
|
Driver's side: Install the cap (B).
|
|
|
 @@@ @@@
|
|
5.
|
Driver's side: Assemble the washer, the collar, and the
bushing on the lower anchor bolt as shown.
|
|
NOTE: Apply medium strength liquid thread lock to the
lower anchor bolt before reinstallation.
|
|
|
 7/1s-2om-min 7/1s-2om-min
|
|
6.
|
Driver's side: Install the lower anchor bolt (A).
|
|
7.
|
Driver's side: Install the lower anchor cap (B).
|
|
7521B6 LEFT FRONT
7521B7 RIGHT FRONT
NOTE: SRS components are located in this area. Review the SRS
component locations and the precautions and procedures be ...
012140
Removal
NOTE: SRS components are located in this area. Review the SRS
component locations and the precautions and procedures before doing
repairs ...
See also:
Honda Civic Owners Manual. Safety Checklist
For the safety of you and your passengers, make a habit of checking these
items
each time before you drive.
After everyone has entered the vehicle, be sure all doors are closed and
locked.
Locking the doors helps prevent an occupant from being ejected and an outsider
from unexpectedly open ...


 Side Impact Sensor (First) Removal and Installation (4-door)
 Subwoofer Removal, Installation, and Test (4-door)


 (o.2ao.sam.


 @@@
@@@ 7/1s-2om-min