Honda Civic Service Manual: Subwoofer Removal, Installation, and Test (4-door)
012140

Removal
|
NOTE: SRS components are located in this area. Review the SRS
component locations and the precautions and procedures before doing
repairs or service.
|
|
|
|
1.
|
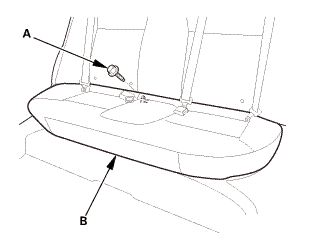
Remove the bolt (A) securing the rear seat cushion (B).
|
|
|
|
|
2.
|
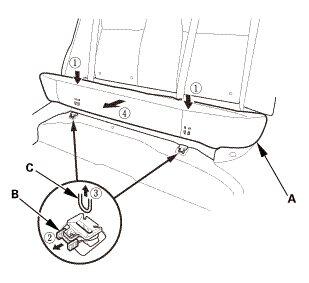
While pushing down the rear seat cushion (A), pull the
seat hook handles (B) to release the hooks (C).
|
|
3.
|
Remove the rear seat cushion.
|
|
| 2. |
Both Rear Seat Side Bolsters |
|

|
|
1.
|
Remove the bolt (A) securing the rear seat side bolster
(B).
|
|
2.
|
The left side is shown; repeat on the right side.
|
|
|

|
|
3.
|
Remove the rear seat side bolster (A).
|
|
4.
|
The left side is shown; repeat on the right side.
|
|
| 3. |
Both Rear Door Opening Seals as Needed |
|

|
|
1.
|
Remove the rear door opening seal (A) as needed.
|
|
2.
|
The left side is shown; repeat on the right side.
|
|
|

|
|
1.
|
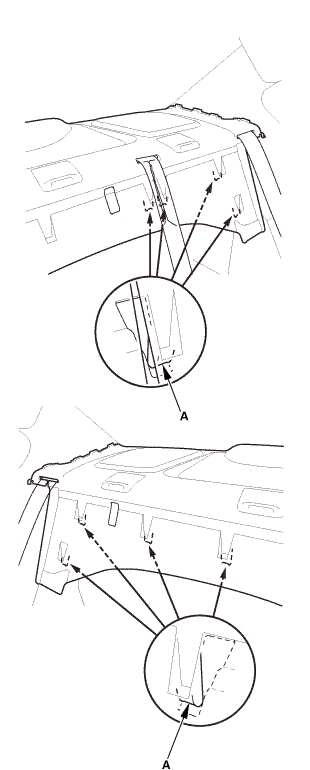
Pull out the C-pillar trim (A) to release the clips.
|
|
2.
|
Remove the C-pillar trim.
|
|
NOTE: The front clip (B) will stay in the body.
|
|
3.
|
The left side is shown; repeat on the right side.
|
|
|

|
|
4.
|
Remove the front clip (A).
|
|
5.
|
The left side is shown; repeat on the right side.
|
|
|

|
|
1.
|
Fold down the seat-back(s).
|
|
2.
|
From the trunk compartment, disconnect the connector
(A).
|
|
|

|
|
3.
|
From the trunk compartment, detach the clips (A).
|
|
|
|
|
4.
|
Release the hooks (A).
|
|
|

|
|
5.
|
Pull out both rear seat belts (A) and the rear center
seat belt (B) through the slits in the rear shelf trim (C),
then remove the rear shelf trim.
|
|
|

|
|
1.
|
Remove the bolts, and remove subwoofer (A).
|
|
2.
|
Disconnect the subwoofer connecctor.
|
|
 Test
Test
|

|
|
1.
|
Measure the resistance between terminals No. 1 and No.
2. There should be about 2 ?.
|
|
2.
|
If the resistance is not as specified, replace the subwoofer
(A).
|
|

Installation
|
NOTE: SRS components are located in this area. Review the SRS
component locations and the precautions and procedures before doing
repairs or service.
|
|

|
|
1.
|
Connect the subwoofer connecctor.
|
|
2.
|
Install the subwoofer (A).
|
|
|

|
|
1.
|
Slip the rear seat belts (A) and the rear center seat
belt (B) through the slits in the rear shelf trim (C).
|
|
|
|
|
2.
|
Install the hooks (A).
|
|
|

|
|
3.
|
Install the clips (A).
|
|
|
|
|
4.
|
From the trunk compartment, connect the connector (A).
|
|
5.
|
Raise the seat-back(s).
|
|
|

|
|
1.
|
Install the new front clip (A) to the C-pillar trim (B).
|
|
|

|
|
2.
|
Install the C-pillar trim (A).
|
|
NOTE:
|
|

|
Make sure the side curtain airbag is
not tucked under the clips or the ribs.
|
|
|
|
Do not push too hard on the C-pillar
trim. If you push too hard, the clip will
be damaged, and it will not hold the trim
properly.
|
|
|
|
Gently tug on the C-pillar trim to verify
that all clips are securely fastened.
|
|
|
|
3.
|
The left side is shown; repeat on the right side.
|
|
| 4. |
Both Rear Door Opening Seals as Needed |
|

|
|
1.
|
Install the rear door opening seal (A).
|
|
2.
|
The left side is shown; repeat on the right side.
|
|
| 5. |
Both Rear Seat Side Bolsters |
|

|
|
1.
|
Install the rear seat side bolster (A).
|
|
2.
|
The left side is shown; repeat on the right side.
|
|
|
 mmmmlnss mmmmlnss
|
|
3.
|
Install the bolt (A) securing the rear seat side bolster
(B).
|
|
4.
|
The left side is shown; repeat on the right side.
|
|
|

|
|
1.
|
Install the hooks (A) to the rear seat cushion clips
(B).
|
|
|
|
|
2.
|
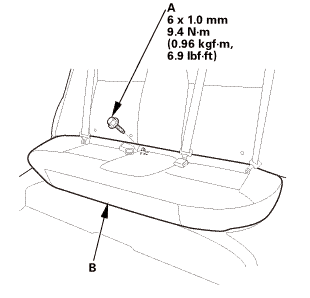
Install the bolt (A) securing the rear seat cushion (B).
|
|
7521C3 LEFT REAR
7521C4 RIGHT REAR
Removal
NOTE: SRS components are located in this area. Review the SRS
component locations and the precautions and proc ...
1.
Trunk Floor Cover
1.
Fold down the seat-back(s).
...
See also:
Honda Civic Owners Manual. Receiving a Call
When there is an incoming call, an audible
notification sounds (if activated) and the
Incoming call screen appears.
Press the button to answer the
call.
Press the button to decline or end
the
call.
Receiving a Call
Call Waiting
Press the button to put
the curr ...
 Side Impact Sensor (Second) Removal and Installation (2-door)
 Taillight Removal and Installation ('13-'14: 4-door except Natural Gas
models)
Taillight Removal and Installation ('13-'14: 4-door except Natural Gas
models)