Honda Civic Service Manual: Starter Removal, Installation, and Performance Test (K24Z7)
1161D1

| 1. |
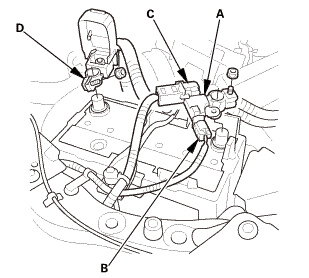
Battery Terminal - Disconnection |
|
|
|
1.
|
Make sure the ignition switch is in LOCK (0), or the vehicle
ignition in the OFF mode.
|
|
2.
|
Disconnect and isolate the negative cable with the battery sensor
(A) from the battery.
|
|
NOTE:
|
|

|
Always disconnect the negative side first.
|
|
|
|
To protect the battery sensor connector (B) from
damage, do not hold it when removing the negative
terminal.
|
|
|
|
Do not disconnect the battery sensor from the
negative terminal (C).
|
|
|
|
3.
|
Disconnect the positive cable (D) from the battery.
|
|
|
|
1.
|
Raise the vehicle on a lift, and make sure it is securely supported.
|
|
|
1.
|
Remove the splash shield (A).
|

|

|
|
1.
|
Remove the starter bolts.
|
|
|

|
|
2.
|
Disconnect the cable and the connector.
|
|

| 1. |
STARTER PERFOMANCE - TEST |
|

|
|
1.
|
Clamp the starter firmly in a vise.
|
|
2.
|
Make the connections for this test using the thickest (gauge)
wire possible (preferably the same gauge as used on the vehicle).
|
|
NOTE: To avoid damaging the starter, never leave the battery
connected for more than 5 seconds.
|
|
3.
|
Connect the battery as shown, and check for continuity between
the B terminal and the starter body. If there is continuity, it
is working properly.
|
|
|

|
|
4.
|
Disconnect the battery from the starter body, and check for continuity
between the B terminal and the starter body. If there is no continuity,
it is working properly.
|
|
|

|
|
5.
|
Connect the starter to the battery as shown, and confirm that
the motor runs.
|
|
6.
|
If the electric current meets the specification when the battery
voltage is at 11.5 V, the starter is working properly.
|
|
|
Specification
|
|
Electric Current: 90 A or less
|
|
|
|
|

|

|
|
2.
|
Connect the cable, and the connector. Make sure the crimped side
of the ring terminal faces away from the starter when you connect
it.
|
|
|
 inl25mm inl25mm
|
|
|
1.
|
Install the splash shield (A).
|

| 3. |
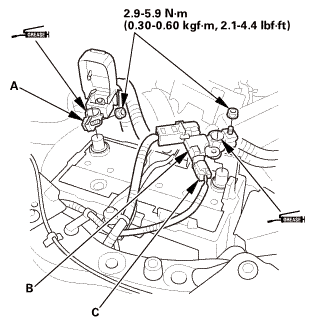
Battery Terminal - Reconnection |
|
|
|
NOTE: If the battery performs abnormally, test the battery.
|
|
1.
|
Clean the battery terminals.
|
|
2.
|
Connect the positive cable (A) to the battery.
|
|
NOTE: Always connect the positive side first.
|
|
3.
|
Connect the negative cable and the battery sensor (B) to the
battery.
|
|
NOTE: To protect the battery sensor connector (C) from damage,
do not hold it when installing the negative terminal.
|
|
4.
|
Apply multipurpose grease to the terminals to prevent corrosion.
|
|
| 4. |
Starter After Install - Check |
|
|
1.
|
Start the engine to make sure the starter works properly.
|
|
View
1.
Starter Exploded View
Exploded View
amcanswrrcsunsrrassemblycam,__switchavnlymolyhdenumavnly
Disassembly
NOTE: Refer to the Exploded ...
See also:
Honda Civic Owners Manual. Checking the Engine
If the engine does not start, check the starter.
Checking the Engine
If you must start the vehicle immediately, use an
assisting vehicle to jump start it.
Starter condition
Checklist
Starter doesn't turn or turns
over slowly.
The batte ...
 Starter Overhaul (K24Z7)
 Valvetrain