Honda Civic Service Manual: Front Passenger's Side Airbag Removal and Installation
751108 RIGHT

Removal
|

|
SRS components are located in this area. Review the SRS component
locations and the precautions and procedures before doing repairs
or service.
|
|
|
|
If replacing the side airbag after deployment, refer to Component
Removal, Installation, and Inspection After Deployment for a complete
list of other parts that must also be replaced.
|
|
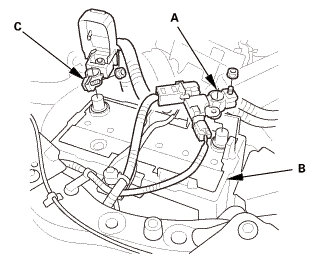
| 1. |
Battery Terminal (SRS) - Disconnection |
|
|
|
1.
|
Make sure the ignition switch is in LOCK (0).
|
|
2.
|
Disconnect and isolate the negative cable and battery sensor
(A) from the battery (B).
|
|
NOTE: Always disconnect the negative side first.
|
|
3.
|
Disconnect the positive cable (C) from the battery.
|
|
4.
|
Wait at least 3 minutes before starting work.
|
|
| 2. |
Front Seat Belt Lower Anchor Bolt - Passenger's Side |
|

|
|
1.
|
Remove the lower anchor bolt (A).
|
|
|

|
|
1.
|
Remove the anchor cover (A).
|
|
|

|
|
2.
|
Remove the lower anchor bolt (A).
|
|
| 3. |
Head Restraint - Passenger's Side |
|

|
|
1.
|
Remove the head restraint (A).
|
|
| 4. |
Front Seat - Passenger's Side |
|
2-door

4-door

|
|
1.
|
Remove both seat track end covers (A).
|
|
|

|
|
2.
|
Remove the seat mounting front bolts (A).
|
|
|

|
|
3.
|
Remove the seat mounting rear bolts (A).
|
|
|

|
|
4.
|
Disconnect the connectors (A).
|
|
| 5. |
Front Seat-Back As Needed - Passenger's Side |
|
2-door

4-door

|
|
1.
|
Release the strap(s) (A).
|
|
|

|
|
2.
|
Detach the connector clip (A).
|
|
3.
|
Detach the harness clip (B).
|
|
4.
|
Release the holders (C).
|
|
|

|
|
5.
|
Unzip the seat-back cover (A).
|
|
6.
|
Release the hook strip (B).
|
|
|

|
|
7.
|
Release the hook strips (A).
|
|
|

|
|
8.
|
Detach the harness clips (A).
|
|
9.
|
Pull out the harness (B).
|
|
|

|
|
10.
|
Release airbag attachment wires A and B.
|
|
|

|
|
11.
|
Remove the cover (A).
|
|
|

|
|
12.
|
Disconnect the connectors (A).
|
|
|

|
|
13.
|
Release the hooks (A).
|
|
14.
|
Detach the harness clips (B).
|
|
| 6. |
Head Restraint Guide - Passenger's Side |
|

|
|
1.
|
Remove the head restraint guides (A).
|
|
| 7. |
Front Seat-Back Cover/Pad - Passenger's Side |
|

|
|
1.
|
Remove the seat-back cover/pad (A).
|
|
|

|
|
1.
|
Remove the side airbag (A).
|
|

Installation
|
NOTE: SRS components are located in this area. Review the SRS component
locations and the precautions and procedures before doing repairs or service.
|
|

|
|
|
If the side airbag lid is secured with tape, remove the
tape.
|
|
|
|
Do not open the lid on the side airbag cover.
|
|
|
|
Make sure that the seat-back cover/pad is installed properly.
Improper installation may prevent proper deployment.
|
|
|
|
Be sure to install the harness so that they are not pinched
or interfering with other parts.
|
|
|
1.
|
Install the side airbag (A), then tighten the new mounting nuts.
|
|
| 2. |
Front Seat-Back Cover/Pad - Passenger's Side |
|

|
|
1.
|
Install the seat-back cover/pad (A).
|
|
| 3. |
Head Restraint Guide - Passenger's Side |
|

|
|
1.
|
Install the head restraint guides (A).
|
|
| 4. |
Front Seat-Back As Needed - Passenger's Side |
|

|
|
1.
|
Install the hooks (A).
|
|
2.
|
Install the harness clips (B).
|
|
|
|
|
3.
|
Connect the connectors (A).
|
|
|

|
|
4.
|
Install the cover (A).
|
|
|
|
|
5.
|
Install airbag attachment wires A and B.
|
|
|

|
|
6.
|
Install the harness (A) through the hole (B).
|
|
7.
|
Install the harness clip (C).
|
|
|
|
|
8.
|
Install the hook strips (A).
|
|
|

|
|
9.
|
Install the hook strip (A).
|
|
10.
|
Zip the seat-back cover (B).
|
|
|

|
|
11.
|
Install the connector clip (A).
|
|
12.
|
Install the harness clip (B).
|
|
13.
|
Install the holders (C).
|
|
|
2-door
4-door
|
|
14.
|
Install the strap(s) (A).
|
|
| 5. |
Front Seat Assembly - Passenger's Side |
|
|
|
1.
|
Connect the connectors (A).
|
|
|
Front side
 mmu....in mmu....in
Rear side

|
|
2.
|
Install the seat mounting bolts (A).
|
|
NOTE:
|
|
|
Tighten the bolts by hand first, then tighten
them to specified torque.
|
|
|
|
Tighten the seat mounting bolts to the specified
torque in the sequence shown. Slide the seat all
the way back and tighten 1 and 2, then slide it
forward and tighten 3 and 4.
|
|
|
|
|
2-door

4-door

|
|
3.
|
Install both seat track end covers (A).
|
|
| 6. |
Head Restraint - Passenger's Side |
|

|
|
1.
|
Install the head restraint (A).
|
|
| 7. |
Front Seat Belt Lower Anchor Bolt - Passenger's Side |
|
 @@ @@
|
|
1.
|
Assemble the washer, the collar, and the bushing on the lower
anchor bolt as shown.
|
|
NOTE: Apply medium strength liquid thread lock to the lower anchor
bolt before reinstallation.
|
|
|
 7/m2onm 7/m2onm
|
|
2.
|
Install the lower anchor bolt (A).
|
|
|
 um22nmin um22nmin
|
|
1.
|
Install the lower anchor bolt (A).
|
|
|

|
|
2.
|
Install the anchor cover (A).
|
|
| 8. |
Battery Terminal (SRS) - Reconnection |
|
 (o.2ao.sam. (o.2ao.sam.
|
|
NOTE: If the battery performs abnormally, test the battery.
|
|
1.
|
Clean the battery terminals.
|
|
2.
|
Connect the positive cable (A) to the battery (B).
|
|
NOTE: Always connect the positive side first.
|
|
3.
|
Connect the negative cable and battery sensor (C) to the battery.
|
|
4.
|
Apply multipurpose grease to the terminals to prevent corrosion.
|
|
|
|
|
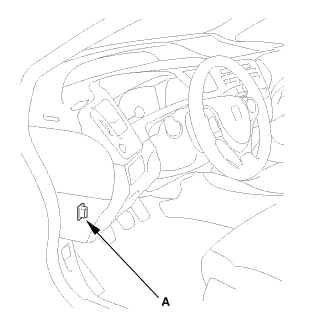
1.
|
Connect the HDS to the data link connector (DLC) (A) located
under the driver's side of the dashboard.
|
|
2.
|
Turn the ignition switch to ON (II).
|
|
3.
|
Make sure the HDS communicates with the vehicle. If it does not
communicate, go to the DLC circuit troubleshooting.
|
|
|
|
1.
|
Clear the DTC(s) by following the screen prompts on the HDS.
|
|
2.
|
Turn the ignition switch to LOCK (0), then wait for 10 seconds.
|
|
| 11. |
Confirm Proper SRS Operation |
|
|
Turn the ignition switch to ON (II), and check that the SRS indicator
comes on for about 6 seconds and then goes off.
|
|
751107 LEFT
Removal
NOTE:
SRS components are located in this area. Review the SRS component
locations and t ...
7521A5 LEFT
7521C2 RIGHT
7521C9 BOTH
Removal
NOTE:
SRS components are located in this area. Review the SRS comp ...
 Driver's Side Airbag Removal and Installation
 Side Curtain Airbag Removal and Installation (2-door)