Honda Civic Service Manual: Clutch Disc Removal, Installation, and Inspection (R18Z1 M/T)
210105

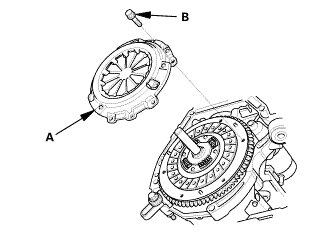
Removal
| 1. | Pressure Plate |
|
|
|

| 2. | Clutch Disc |
|
|
|

 Inspection
| 1. | Clutch Disc Inspection |
|
|
|
|||||||||||||||

|
|
|
||||||||||||


Installation
| 1. | Clutch Disc |
|
|
|
||||||||||||
 (pm
(pm| 2. | Pressure Plate |
|
|
|
|
|
|
|||||||||||||||||||||||||||||||||
 a7aag-suaa1aa
 Clutch Disc Removal, Installation, and Inspection (K24Z7)
2101D7
Removal
1.
Pressure Plate
1.
Install the ring gear holder.
...
 Clutch Master Cylinder Removal and Installation (K24Z7)
2111C5
NOTE:
Use fender covers to avoid damaging painted surfaces.
...
See also:
Honda Civic Owners Manual. Checking Tires
To safely operate your vehicle, your tires must be of the proper type and
size, in
good condition with adequate tread, and properly inflated.
Inflation guidelines
Properly inflated tires provide the best combination of handling, tread life,
and
comfort. Refer to the driver's doorjamb label o ...
