Honda Civic Service Manual: Windshield Removal and Installation
831120

Removal
| 1. | Wiper Arm Assembly |
|
|
|

| 2. | Both Side Cowl Covers |
|
|
|

| 3. | Center Cowl Cover |
|
|
|

| 4. | Front Door Opening Seal As Needed Both |
|
|
|

| 5. | A-Pillar Trim Both |
|
|
|

|
|
|

|
|
|
||||||

|
|
|

| 6. | Rearview Mirror |
|
|
|

| 7. | Both Sunvisors |
|
|
|
||||||

|
|
|
||||||

|
|
|
||||||

|
|
|

|
|
|

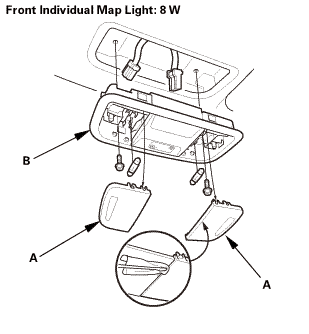
| 8. | Front Individual Map Light (without moonroof) |
|
|
|
| 9. | Headliner As Needed - Front Side |
|
|
|

| 10. | Roof Molding Both |
|
|
|

|
|
|

|
|
|

| 11. | Windshield |
|
|
|

|
Cutting positions
|
|


Installation
| 1. | Windshield |
|
2-door
4-door
|
|
||||||||||||||||||||||||||||||||||

 mmin!
mmin!
|
|
|
|||||||||||||||||

|
|
|
||||||||||||||||||||||
 replace......(n.2i7am......m)
|
|
|
||||||||||||||||||||||
 n-im15mm(n.s2mlnunin)..
|
|
|
 mm(n.nammm
|
|
|
|||||||||||||||||||||||||||||||||||||||||||||||
 mmumin)
| 2. | Roof Molding Both |
|
|
|

|
|
|

|
|
|

|
|
|

| 3. | Headliner As Needed - Front Side |
|
|
|

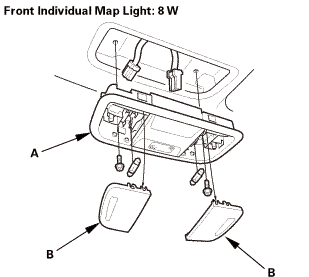
| 4. | Front Individual Map Light (without moonroof) |
|
|
|
| 5. | Both Sunvisors |
|
|
|

|
|
|
|
|
|

| 6. | Rearview Mirror |
|
|
|

| 7. | A-Pillar Trim Both |
|
|
|

|
|
|
||||||||||||||||||||||||||||||

| 8. | Front Door Opening Seal as Needed Both |
|
|
|

| 9. | Center Cowl Cover |
|
|
|

| 10. | Both Side Cowl Covers |
|
|
|
| 11. | Wiper Arm Assembly |
|
|
|
 1.122
1.122| 12. | Water Leak Test |
|
|
|
 12mmznamm(12in)
| 13. | Wiper Arm/Nozzle - Adjustment |

|
|||
|
|
1. |
Turn the ignition switch to ON (II), then turn the wiper switch ON, and then back OFF. |

|
2. |
When the wiper arms stop at the auto-stop position, make sure that they are at the correct position: |
|||||||||||||||||||||||||||
|
||||||||||||||||||||||||||||
|
3. |
When you turn on the washer(s), make sure 50 % or more of the washer fluid lands within the spray area. If the spray area is not within the standard positions, adjust the nozzle(s): |
|||||||||||||||||||||||||||
|
||||||||||||||||||||||||||||
 Windshield
...

See also:
Honda Civic Owners Manual. Parking Brake
Use the parking brake to keep the vehicle stationary when parked. When the
parking brake is applied, you can manually or automatically release it.
To apply
The electric parking brake can be applied any
time the vehicle has battery, no matter which
position the ignition switch*1 is in.
Pull ...
