Honda Civic Service Manual: Parking Brake Cable Removal and Installation (Disc Brake)
412101 LEFT
412102 RIGHT
4121A6 BOTH

| 1. |
Parking Brake Cable Exploded View (Disc Brake) |
 mmmm22ofsourorandlevern-mandleftcheckzuumzznsum:beinslallalianofequalizer

|
NOTE: Refer to the Exploded View as needed during this procedure.
|
|
|
1.
|
Raise the vehicle on a lift, and make sure it is securely supported.
|
|
|
Except K24Z7 engine

|
|
1.
|
Except K24Z7 engine: Lower the shift lever boot (A) to release
the hooks from the boot.
|
|
2.
|
Except K24Z7 engine: Remove the shift lever knob (B).
|
|
|
K24Z7 engine

|
|
3.
|
K24Z7 engine: Lower the shift lever boot (A) to release the hooks
from the boot.
|
|
4.
|
K24Z7 engine: Loosen the shift lever boot ring (B).
|
|
5.
|
K24Z7 engine: Remove the shift lever knob (C).
|
|
6.
|
K24Z7 engine: Remove the shift lever boot ring.
|
|
|

|
|
2.
|
Remove the center console panel (B).
|
|
3.
|
For some models: Disconnect the connector(s) (C).
|
|
| 4. |
Center Console Panel Assembly (Except '12M M/T) |
|

|
|
2.
|
Remove the center console panel (A).
|
|
3.
|
For some models: Disconnect the connector(s) (B).
|
|
| 5. |
Cup Holder Panel Assembly |
|

|
|
1.
|
Remove the cup holder panel assembly (A).
|
|
|

|
|
2.
|
Disconnect the connector (B).
|
|
|

|
|
3.
|
Remove the console box mat (A).
|
|
|

|
|
5.
|
Disconnect the connector (A).
|
|
|

|
|
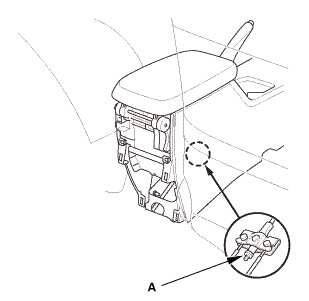
6.
|
Remove the center console (A).
|
|
| 7. |
Parking Brake Adjusting Bolt - Loosen |
|
|
|
1.
|
Release the parking brake lever fully.
|
|
2.
|
Loosen the adjusting nut (A).
|
|
| 8. |
Parking Brake Cable Lever Side - Disconnection |
|

|
|
1.
|
Release the parking brake lever fully.
|
|
2.
|
Remove the wire guide base (A).
|
|
3.
|
Disconnect the parking brake cables (B) from the equalizer (C).
|
|
|

|
|
1.
|
Remove the rear wheel.
|
|
| 10. |
Left Floor Undercover |
|

|
|
1.
|
Remove the left floor undercover (A).
|
|
| 11. |
Right Floor Undercover |
|

|
|
1.
|
Remove the right floor undercover (A).
|
|
| 12. |
Parking Brake Cable (Disc Brake) |
|

|
|
1.
|
Remove the parking brake cable clip (A).
|
|
2.
|
Disconnect the parking brake cable (B) from the lever (C).
|
|
NOTE: Be careful not to bend or distort the cable and boot (D).
|
|
|

|
|
3.
|
Remove the parking brake cable grommets (A).
|
|
4.
|
Remove the parking brake cable mounting hardware.
|
|
5.
|
Remove the parking brake cable.
|
|

|
NOTE: Refer to the Exploded View as needed during this procedure.
|
| 1. |
Parking Brake Cable (Disc Brake) |
|
|
|
1.
|
Install the parking brake cable.
|
|
2.
|
Install the parking brake cable mounting hardware.
|
|
3.
|
Install the parking brake cable grommets (A).
|
|
|

|
|
4.
|
Connect the parking brake cable (A) to the lever (B).
|
|
5.
|
Install the parking brake cable clip (C).
|
|
NOTE:
|
|

|
Be careful not to bend or distort the cable and
boot (D).
|
|
|
|
Make sure the parking brake cable clip is fully
seated on the cable housing.
|
|
|
|
| 2. |
Parking Brake Cable Lever Side - Reconnection |
|

|
|
1.
|
Connect the parking brake cables (A) to the equalizer (B).
|
|
2.
|
Install the wire guide base (C).
|
|
| 3. |
Rear Brake Caliper Lever - Contact Check (Disc Brake) |
|

|
|
1.
|
Make sure the lever (A) on the rear brake caliper contacts the
stop pin (B).
|
|
NOTE: The lever will only contact the stop pin when the parking
brake adjusting nut is loosened.
|
|
| 4. |
Right Floor Undercover |
|

|
|
1.
|
Install the right floor undercover (A).
|
|
|

|
|
1.
|
Install the left floor undercover (A).
|
|
|
 15mmumum 15mmumum
|
|
1.
|
Install the rear wheel.
|
|
NOTE: Before installing the wheel, clean the mating surfaces
between the brake disc or the brake drum and the inside of the wheel.
|
|
| 7. |
Parking Brake - Adjustment (Disc Brake) |
|
|
1.
|
Pull the parking brake lever 1 click.
|
|
2.
|
Tighten the parking brake adjusting nut until the parking brakes
drag slightly when the rear wheels are turned.
|
|
3.
|
Release the parking brake lever fully.
|
|
4.
|
Check that the parking brakes do not drag when the rear wheels
are turned.
|
|
5.
|
Readjust if necessary.
|
|
6.
|
Make sure the parking brake lever is within the specified number
of clicks (Except Si: 8 to 10 clicks, Si: 8 to 9 clicks).
|
|
|

|
|
1.
|
Install the center console (A).
|
|
|
|
|
2.
|
Connect the connector (A).
|
|
|

|
|
3.
|
Install the bolts (A).
|
|
4.
|
Install the console box mat (B).
|
|
|

|
|
5.
|
Connect the connector (A).
|
|
6.
|
Install the bolts (B).
|
|
| 9. |
Cup Holder Panel Assembly |
|
|
|
1.
|
Install the cup holder panel assembly (A).
|
|
| 10. |
Center Console Panel Assembly (Except '12M M/T) |
|

|
|
1.
|
For some models: Connect the connector(s) (A).
|
|
2.
|
Install the center console panel (B).
|
|
|

|
|
3.
|
Install the clips (A).
|
|
|

|
|
1.
|
For some models: Connect the connector(s) (A).
|
|
2.
|
Install the center console panel (B).
|
|
3.
|
Install the clips (C).
|
|
|
Except K24Z7 engine

|
|
1.
|
Except K24Z7 engine: Install the shift lever knob (A).
|
|
NOTE: Tighten the shift lever knob until the shift pattern is
properly aligned.
|
|
2.
|
Except K24Z7 engine: Connect the shift lever boot (B).
|
|
|
K24Z7 engine

|
|
3.
|
K24Z7 engine: Install and turn the shift lever boot ring (A)
until it reaches the bottom of the threads on the shift lever.
|
|
4.
|
K24Z7 engine: Turn the shift lever knob (B) until the shift lever
knob contacts the shift lever boot ring.
|
|
5.
|
K24Z7 engine: Tighten the shift lever boot ring and the shift
lever knob together with the shift pattern properly aligned.
|
|
6.
|
K24Z7 engine: Connect the shift lever boot (C).
|
|
See also:
Honda Civic Owners Manual. Using the Remote Transmitter
Locking the doors
Press the lock button.
Once:
Some exterior lights flash, all the doors
and fuel fill door lock, and the security
system sets.
Twice (within five seconds after the first
push):
The beeper sounds and verifies the
security system is set.
Using the Remote Tra ...


