Honda Civic Service Manual: High Mount Brake Light Removal and Installation (Natural Gas models)

Removal
| 1. | Rear Seat Cushion |
|
|
|
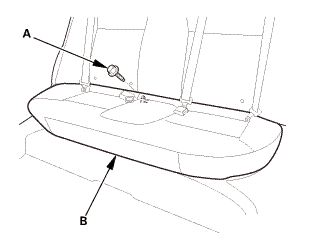
|
|
|
| 2. | Rear Seat-Back (Natural Gas Model) |
|
|
|

|
|
|

|
|
|

| 3. | Both Rear Door Opening Seals as Needed |
|
|
|

| 4. | Both C-Pillar Trims |
|
|
|
||||||||||||

|
|
|

| 5. | Rear Shelf (Natural Gas Model) |
|
|
|

|
|
|

|
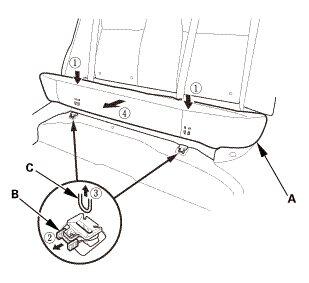
3. |
Pull out both rear seat belts (A) and the rear center seat belt (B) through the slits in the rear shelf trim (C), then remove the rear shelf trim. |

| 6. | High Mount Brake Light |
|
|
|


Installation
| 1. | High Mount Brake Light |
|
|
|
| 2. | Rear Shelf (Natural Gas Model) |
|
1. |
Slip the rear seat belts (A) and the rear center seat belt (B) through the slits in the rear shelf trim (C). |

|
|
|

|
|
|
| 3. | Both C-Pillar Trims |
|
|
|

|
|
|
||||||||||||||||||||||||


| 4. | Both Rear Door Opening Seals as Needed |
|
|
|

| 5. | Rear Seat-Back (Natural Gas Model) |
|
|
|

|
|
|
 m.imim
|
|
|

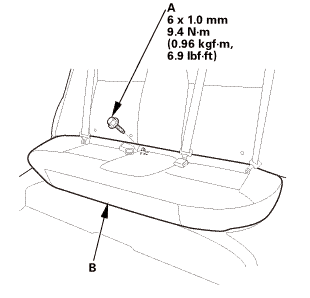
| 6. | Rear Seat Cushion |
|
|
|

|
|
|

 High Mount Brake Light Removal and Installation - With Trunk Lid Spoiler ('13-'14:
4-door)
High Mount Brake Light Removal and Installation - With Trunk Lid Spoiler ('13-'14:
4-door)
1.
High Mount Brake Light
maunlled
1.
Remove the high mount brake light (A) from the trunk lid spoiler.
...
See also:
Honda Civic Owners Manual. Synchronized Mode
You can set the temperature synchronously for the driver’s side and the
passenger’s
side in synchronized mode.
1. Press the SYNC button.
The system switches to synchronized mode.
2. Adjust the temperature using the driver’s side temperature control dial.
Press the SYNC button ...
