Honda Civic manuals

Honda Civic Service Manual: Fuel Tank Scrapping (R18A9)

Honda Civic Service Manual / Powertrain / Engine / Fuel System / Fuel Tank / Fuel Tank Scrapping (R18A9)

NOTE: The fuel tank must be replaced 15 years after its production date.


1. Vehicle Lift

1.

Raise the vehicle on a lift, and make sure it is securely supported.


2. Fuel Pressure - Relieving (At the fuel tank (If the engine does not start)) (Natural Gas Model)

Compressed natural gas is flammable and highly explosive. You could be killed or seriously injured if leaking natural gas is ignited.
Stop the engine, and keep heat, sparks, and flames away.


This procedure should be done outside in a well-ventilated area or in a properly equipped CNG shop.


1.

Do the battery disconnection procedure.


2.

Close the manual shut-off valve (A).


3.

Slowly loosen the fuel supply line nut (B) going into fuel filter A. Continue to slowly loosen the nut until it is disconnected from fuel filter A.


NOTE:

The nut may be difficult to turn at first, because of fuel pressure in the line. The fuel eventually escapes with a hiss.

Always use two wrenches when removing or installing fuel line nuts.


4.

Loosen the fuel supply line (C) at the manual shut-off valve, move the end of the line away from fuel filter A, then connect a fuel vent tube (D) (available from the AH special tools department) to the end of the line.


5.

Vent the fuel in the line between the fuel tank and the manual shut-off valve by fully opening the manual shut-off valve. The small amount of fuel in the line should vent quickly with a hissing sound. The fuel flow should stop after a few seconds.


If the fuel flow stops within a few seconds, close the manual shut-off valve, and go to step 6.

If the fuel flow does not stop within a few seconds, close the manual shut-off valve, then go to step 6 of At the fuel tank (If the fuel tank internal valve is stuck open).


6.

Attach one end of the ground wire (A) (included with the new fuel tank) to the fuel supply line.


7.

Route the other end of the ground wire into the vehicle, where it will not interfere with vehicle movement.


n-mn


8.

Slowly remove the manual lock-down valve (A) from the fuel line side of the fuel tank, then install a manual override vent tool (B) (available from the AH special tools department) with the allen bolt fully out.


NOTE: Do not remove the valve (C) from the receptacle side of the fuel tank solenoid valve.


9.

With the help of an assistant, push the vehicle outside, near a metal water pipe or a chain-link fence, where the fuel can be safely vented.


10.

Attach the other end of the ground wire to the water pipe or to a chain-link fence post buried in the ground. This disperses any static electricity into the ground.


11.

Using an Allen wrench, slowly turn the bolt in the manual override vent tool clockwise until the bolt stops.


12.

Vent the fuel from the tank by opening the manual shut-off valve. The fuel tank is empty when the hissing stops, or when fuel cannot be felt coming from the vent pipe. Once the tank is empty, close the manual shut-off valve.


NOTE: Depending on the amount of fuel in the tank, fuel venting can take from several minutes, up to a few hours.


13.

Remove the manual override vent tool, then reinstall the manual lock-down valve.


14.

Reinstall the fuel line to fuel filter A with a new O-ring, then retighten the fuel line at the manual shut-off valve.


15.

Do a leak inspection after replacing the fuel tank or the fuel tank solenoid


16.

Do the battery reconnection procedure.


3. Fuel Purge<CNG>

1.

Purge any remaining fuel from the tank with compressed air.


4. Fuel Pressure - Relieving (Between the fuel tank and the engine) (Natural Gas Model)


Compressed natural gas is flammable and highly explosive. You could be killed or seriously injured if leaking natural gas is ignited.
Stop the engine, and keep heat, sparks, and flames away.


This procedure should be done outside in a well-ventilated area or in a properly equipped CNG shop.


This procedure will allow you to safely work on any part of the fuel system downstream of the fuel tank such as the fuel joint block or the manual shut-off valve.


NOTE: Make sure the manual shut-off valve is open.


1.

Remove the rear seat.


2.

Remove the seat back.


3.

Disconnect the connector (A) (this prevents the tank from supplying fuel to the system).


4.

Start the engine, and let it idle.


5.

After a few minutes, the engine will stall.


6.

Turn the ignition switch to LOCK (0).


5. Rear Floor Undercover (Natural Gas Model)

1.

Remove the rear floor undercover (A).


6. Fuel Pipes at the Fuel Joint Block (Natural Gas Model)

1.

Remove the three fuel pipes (A) at the fuel joint block (B) and the two fuel joint block mounting bolts (C).


NOTE: Always use two wrenches when removing fuel pipe nuts.


7. Lower The Vehicle On The Lift

1.

Lower the vehicle on the lift.


8. Left Rear Door Panel Assembly (Natural Gas Model)

1.

Remove the left rear door assembly (A).


2.

Disconnect the connector (A).


9. Rear Seat Cushion

1.

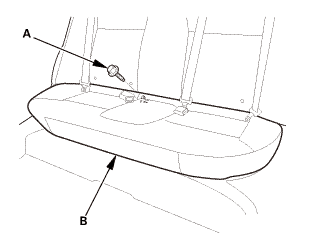
Remove the bolt (A) securing the rear seat cushion (B).


2.

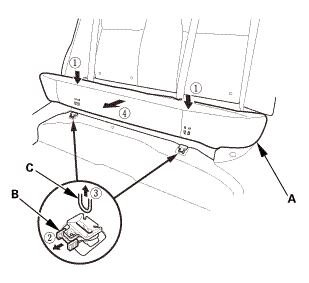
While pushing down the rear seat cushion (A), pull the seat hook handles (B) to release the hooks (C).


3.

Remove the rear seat cushion.


10. Center seat belt buckle bolt

1.

Remove the center seat belt buckle bolt (A) at the floor.


11. Rear Seat-Back (Natural Gas Model)

1.

Release the center seat belt (A) from the center belt guide (B).


2.

Remove the bolts (A).


3.

Remove the rear seat-back (A).


12. Both C-Pillar Trims


1.

Pull out the C-pillar trim (A) to release the clips.


2.

Remove the C-pillar trim.


NOTE: The front clip (B) will stay in the body.


3.

The left side is shown; repeat on the right side.


4.

Remove the front clip (A).


5.

The left side is shown; repeat on the right side.


13. Rear Shelf (Natural Gas Model)

1.

From the trunk compartment, disconnect the connector (A).


2.

From the trunk compartment, detach the clips (A).


3.

Pull out both rear seat belts (A) and the rear center seat belt (B) through the slits in the rear shelf trim (C), then remove the rear shelf trim.


14. Trunk Floor Lid (Natural Gas Model)

1.

Remove the trunk floor cover (A).


15. Trunk Front Trim Panel (Natural Gas Model)

1.

Remove the trunk front trim panel (A) and the trunk partition (B) as an assembly.


16. Fuel Tank Protector (Natural Gas Model)

1.

Remove the fuel tank protector (A).


17. Rear Bulkhead Gusset Both Sides (Natural Gas Model)

1.

Remove the gussets (A).


18. Rear Parcel Cover (Natural Gas Model)

1.

Disconnect the speaker connectors, and remove the rear parcel cover (A).


19. Rear Shelf Gusset Both Sides (Natural Gas Model)

1.

Remove the rear shelf gussets (A) in the trunk.


20. Rear Floor Upper Crossmember Gusset (Natural Gas Model)

1.

Remove the rear floor upper crossmember gusset (A).


21. Fuel Tank Assembly (Natural Gas Model)

1.

Remove the bolts (A).


2.

Disconnect the vent hose (A).


3.

Remove the tank frame mounting bolts (A).


4.

Push the front seats forward, then cover the seats and the floor with a tarp or similar material.


5.

With the help of two other technicians, lift the frame, and slide the entire fuel tank assembly (A) into the passenger compartment. Be careful not to damage the fuel joint block.


6.

Rotate the fuel tank so the fuel joint block and the frame can clear the left rear door opening, then carefully remove the fuel tank assembly from the vehicle.


1. Fuel Tank - Disposal<CNG>

1.

Dispose of the fuel tank according to your local regulations.


Fuel Tank Removal and Installation (R18Z1)
1. Fuel Filler Cap 1. Remove the fuel fill cap to relieve the pressure in the fuel tank. ...

Fuel Tank Undercover Removal and Installation
8131H7 1. Vehicle Lift 1. Raise the vehicle on a lift, and make sure it is securely supported. ...

See also:

Honda Civic Service Manual. Rear Spring Removal and Installation (Disc Brake)
417126 LEFT 417131 RIGHT 417121 BOTH 1. Rear Spring Exploded View Exploded View cusmoucheckorandlowersunand NOTE: Refer to the Exploded View as needed during the following procedures. 1. Vehicle Lift ...

© 2016-2025 Copyright www.hocivic.com

0.0133