Honda Civic Service Manual: Front Door Regulator Removal and Installation (2-door)

Removal
| 1. |
Front Door Panel (2-Door) |
|
|
|
1.
|
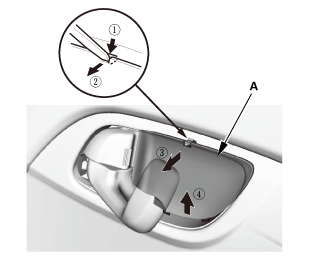
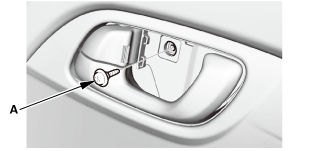
Remove the inner handle cap (A).
|
|
|

|
|
3.
|
Remove the grip trim (A).
|
|
|

|
|
4.
|
Remove the screws (A).
|
|
|

|
|
5.
|
Remove the door panel (A).
|
|
| 2. |
Front Door Plastic Cover (2-door) |
|

|
|
1.
|
Remove the harness clip (A).
|
|
2.
|
Remove the plastic cover (B).
|
|
| 3. |
Front Door Glass - Support |
|
|
|
2.
|
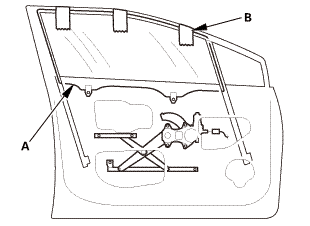
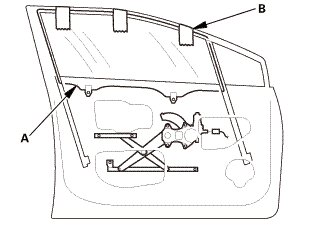
Secure the glass (A) with tape (B).
|
|
|
|
|
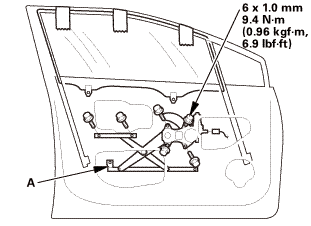
1.
|
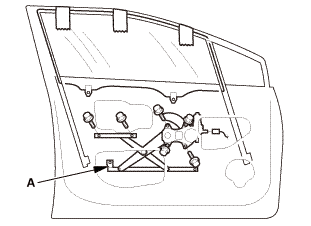
Remove the regulator (A).
|
|

Installation
|
|
|
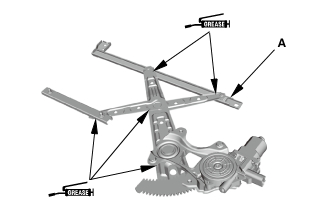
1.
|
Apply multipurpose grease to all the sliding surfaces
of the regulator (A).
|
|
|
|
|
2.
|
Install the regulator (A).
|
|
| 2. |
Front Door Glass - Support |
|
|
|
1.
|
While holding the glass (A), remove the tape (B).
|
|
|
|
|
2.
|
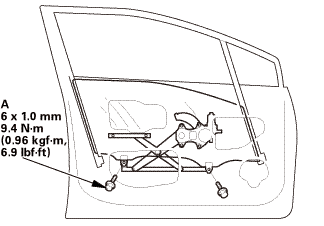
Install the bolts (A).
|
|
| 3. |
Front Door Glass - Adjustment |
|

|
|
NOTE: Check the door weatherstrip and the glass run channel
for damage or deterioration, and replace them if necessary.
|
|
1.
|
Place the vehicle on a firm, level surface when adjusting
the door glass.
|
|
2.
|
Carefully lower the glass (A) until you can see the glass
mounting bolts (B), then loosen them.
|
|
3.
|
Push the glass against the glass run channel, then tighten
the glass mounting bolts.
|
|
4.
|
Check that the glass moves smoothly.
|
|
|

|
|
5.
|
Raise the glass fully, and check for gaps. Also make
sure that the glass (A) contacts the glass run channel (B)
evenly.
|
|
| 4. |
Front Door Plastic Cover (2-door) |
|

|
|
1.
|
Install the plastic cover (A).
|
|
2.
|
Install the harness clip (B).
|
|
| 5. |
Front Door Panel (2-Door) |
|

|
|
1.
|
Install the door panel (A).
|
|
|
|
|
2.
|
Install the screws (A).
|
|
|

|
|
3.
|
Install the grip trim (A).
|
|
|
|
|
4.
|
Install the screw (A).
|
|
|

|
|
5.
|
Install the inner handle cap (A).
|
|
| 6. |
Power Window Control Unit - Reset |
|
Resetting the power window is required when any of the following
have occurred:
|
|

|
Power window regulator replacement or repair
|
|
|
|
Power window motor replacement or repair
|
|
|
|
Glass run channel replacement
|
|
|
|
Driver's door glass replacement
|
|
|
|
Power window master switch replacement
|
|
|
1.
|
Turn the ignition switch to ON (II).
|
|
2.
|
Move the driver's window all the way down with the driver's window
DOWN switch.
|
|
3.
|
Open the driver's door.
|
|
NOTE: Steps 4-7 must be done within 5 seconds of each other.
|
|
4.
|
Turn the ignition switch to LOCK (0).
|
 armounupnwlrwindnwdawdawnswiich
|
5.
|
Push and hold the driver's window DOWN switch.
|
|
6.
|
Turn the ignition switch to ON (II).
|
|
7.
|
Release the driver's window DOWN switch.
|
|
8.
|
Repeat step 4-7 three more times.
|
|
9.
|
Wait at least 1 second.
|
|
10.
|
Confirm that AUTO UP and AUTO DOWN do not work. If AUTO UP and
DOWN work, go back to step 1.
|
|
11.
|
Move the driver's window all the way down with the driver's window
DOWN switch.
|
|
12.
|
Pull up and hold the driver's window UP switch until the window
reaches the fully closed position, then continue to hold the switch
for at least 1 second.
|
|
13.
|
Confirm that the power window control unit is reset by using
the driver's window AUTO UP and AUTO DOWN functions:
|
|
|
If the window still does not work in AUTO, repeat
the procedure several times, paying close attention
to the 5 second time limit between steps.
|
|
|
|
If the window still does not work, refer to the
master switch input test.
|
|
|
Removal
1.
Front Door Panel (2-Door)
1.
Remove the inner handle ...
Removal
1.
Front Door Power Window Switch Panel (4-door)
1.
Rem ...
See also:
Honda Civic Owners Manual. Seat Belt Inspection
Regularly check the condition of your seat belts as follows:
Pull each belt out fully, and look for frays, cuts, burns, and wear.
Check that the latch plates and buckles work smoothly and the belts
retract
easily.
If a belt does not retract easily, cleaning the belt may correct the pro ...

 Front Door Panel Removal and Installation (2-door)
 Front Door Regulator Removal and Installation (4-door)