Honda Civic Service Manual: Front Door Latch Removal and Installation (4-door)
818100 LEFT
819100 RIGHT

Removal
| 1. |
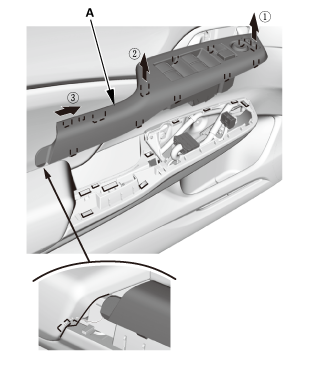
Front Door Power Window Switch Panel (4-door) |
|
|
|
1.
|
Remove the power window switch panel (A).
|
|
| 2. |
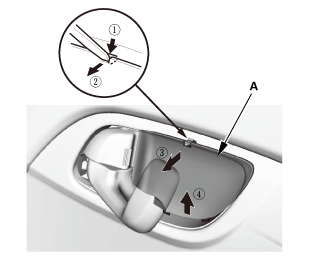
Front Door Panel - Driver's Side (4-Door) |
|
|
|
1.
|
Remove the inner handle cap (A).
|
|
|
|
|
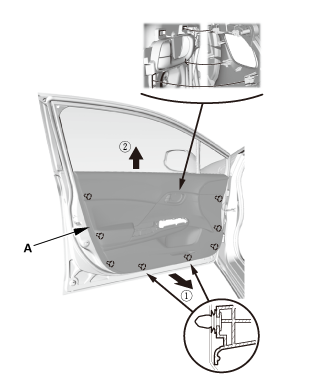
4.
|
Remove the door panel (A).
|
|
| 3. |
Front Door Plastic Cover As Needed (4-door) |
|

|
|
1.
|
Detach the harness clip (A).
|
|
2.
|
Remove the plastic cover (B) as needed.
|
|
| 4. |
Front Door Center Lower Channel |
|

|
|
1.
|
Remove the center lower channel (A).
|
|
|

|
|
1.
|
Remove the plug cap (A) and the bolt (B).
|
|
|

|
|
2.
|
Remove the door lock cylinder (A).
|
|
|

|
|
1.
|
Release the rod fastener (A).
|
|
|

|
|
2.
|
Disconnect the outer handle rod (A).
|
|
|

|
|
3.
|
Detach the cable clip (A).
|
|
|

|
|
5.
|
Open the latch protector (A).
|
|
|

|
|
6.
|
Disconnect the latch cable (A) and the inner handle cable
(B).
|
|

Installation
|

|
|
1.
|
Connect the latch cable (A) and the inner handle cable
(B).
|
|
Note: If a dealer needs to replace the latch cable or
the inner handle cable grease must be applied to the cables
as per (S/B12-016). Please use Dow Corning 111 valve lubricant
& sealant.
|
|
|

|
|
2.
|
Close the latch protector (A).
|
|
|

|
|
3.
|
Install the latch (A).
|
|
4.
|
Attach the cable clip (B).
|
|
|

|
|
5.
|
Connect the outer handle rod (A).
|
|
|

|
|
6.
|
Install the rod fastener (A).
|
|
|

|
|
1.
|
Install the door lock cylinder (A).
|
|
|

|
|
2.
|
Install the bolt (A) and the plug cap (B).
|
|
| 3. |
Front Door Center Lower Channel |
|

|
|
1.
|
Install the center lower channel (A).
|
|
| 4. |
Front Door Plastic Cover as Needed (4-door) |
|

|
|
1.
|
Install the plastic cover (A).
|
|
2.
|
Attach the harness clip (B).
|
|
| 5. |
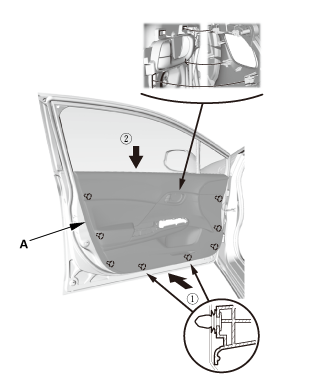
Front Door Panel - Driver's Side (4-Door) |
|
|
|
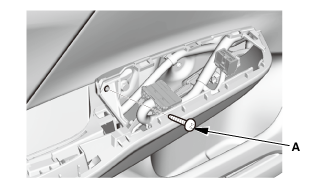
1.
|
Install the door panel (A).
|
|
|
|
|
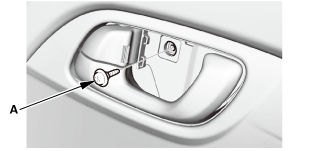
2.
|
Install the screw (A).
|
|
|
|
|
3.
|
Install the screw (A).
|
|
|
|
|
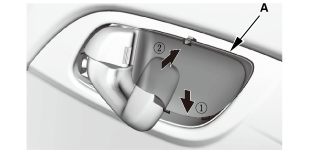
4.
|
Install the inner handle cap (A).
|
|
| 6. |
Front Door Power Window Switch Panel (4-door) |
|
|
|
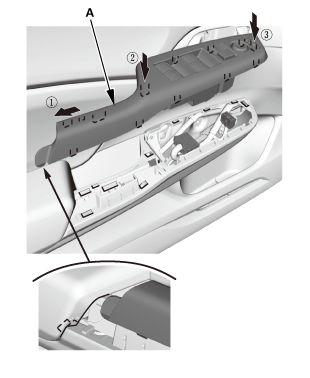
1.
|
Install the power window switch panel (A).
|
|
Adjustment
1.
Door Striker - Adjustment
mmmmmm
Make sure the door latches securely without slam ...


 Door Striker Adjustment
 Fuel/Charge Lid


