Honda Civic Service Manual: Flywheel Removal and Installation (R18Z1 M/T)
210101

Removal
|

|
|
1.
|
Install the ring gear holder.
|
|
2.
|
Install the clutch alignment shaft and the remover handle.
|
|
3.
|
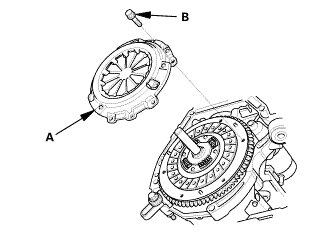
To prevent warping, loosen the pressure plate mounting bolts
(A) in a crisscross pattern in several steps.
|
|
4.
|
Remove the pressure plate (B).
|
|
|

|
|
1.
|
Remove the clutch disc (A), the clutch alignment shaft, and the
remover handle.
|
|
|
 n7lab-wnolun n7lab-wnolun
|
|
1.
|
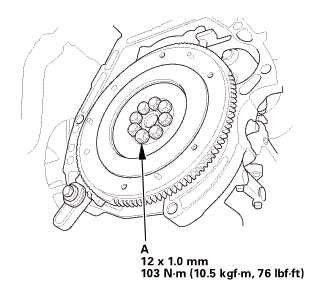
Remove the flywheel (A).
|
|
NOTE: Loosen the flywheel mounting bolts (B) in a crisscross
pattern in several steps.
|
|
2.
|
Remove the ring gear holder.
|
|

Installation
|

|
|
1.
|
Install the flywheel (A) on the crankshaft, and install the mounting
bolts (B) finger-tight.
|
|
2.
|
Install the ring gear holder.
|
|
|
 :2minn-inno :2minn-inno
|
|
3.
|
Tighten the flywheel mounting bolts (A) in a crisscross pattern
in several steps.
|
|
|
 (pm (pm
|
|
1.
|
Temporarily install the clutch disc onto the splines of the transmission
mainshaft. Make sure the clutch disc slides freely on the mainshaft.
|
|
2.
|
Apply super high temp urea grease (P/N 08798-9002) to the splines
(A) of the clutch disc (B).
|
|
NOTE: Wipe off any excess grease.
|
|
3.
|
Install the clutch disc using the clutch alignment shaft and
the remover handle.
|
|
|
|
|
1.
|
Install the pressure plate (A) and the mounting bolts (B) finger-tight.
|
|
|
 a7aag-suaa1aa a7aag-suaa1aa
|
|
2.
|
Torque the pressure plate mounting bolts (A) in a crisscross
pattern.
|
|
NOTE:
|
|

|
Tighten the bolts in several steps to prevent
warping the diaphragm spring.
|
|
|
|
Make sure that there is no clearance between
the pressure plate and the flywheel.
|
|
|
|
|
Specified Torque:
|
25 N·m (2.5 kgf·m, 18 lbf·ft)
|
|
|
|
|
3.
|
Remove the ring gear holder.
|
|
4.
|
Remove the clutch alignment shaft and the remover handle.
|
|
5.
|
Make sure the diaphragm spring fingers are all the same height.
|
|
11010A
1.
Vehicle Lift
1.
Raise the vehicle on a lift, and make sure it is securely supported.
...
1.
Front Driveshaft Exploded View
Exploded View
looponly!mboaldsslusegreasemcludedmhaardhamlowampsnvmwucdamperwwstopringlowearrehlace.lhglnasn...oumaam
...
See also:
Honda Civic Owners Manual. Emergency Towing
Call a professional towing service if you need to tow your vehicle.
Flat bed equipment
The operator loads your vehicle on the back of a truck.
This is the best way to transport your vehicle.
Wheel lift equipment
The tow truck uses two pivoting arms that go under the front tires an ...
 Engine Removal and Installation (R18Z1 (A/T, M/T))
 Front Driveshaft Disassembly and Reassembly (A/T, M/T)