Honda Civic manuals

Honda Civic Service Manual: ECM Removal and Installation (K24Z7)

Honda Civic Service Manual / Powertrain / Engine / Emissions / ECM Removal and Installation (K24Z7)

1211K3

Removal

1. Battery Terminal - Disconnection


1.

Make sure the ignition switch is in LOCK (0).


2.

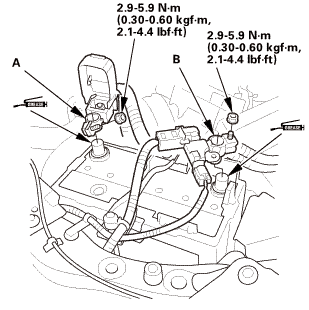
Disconnect and isolate the negative cable and battery sensor (A) from the battery.


NOTE: Always disconnect the negative side first.


3.

Disconnect the positive cable (B) from the battery.


2. ECM Assembly

1.

Remove the cover (A).


2.

Disconnect ECM connectors A, B, and C.


NOTE: ECM connectors A, B, and C have symbols (A=□, B=△, C=○) embossed on them for identification.


3.

Remove the ECM (D).


Installation

1. ECM Assembly


1.

Connect ECM connectors A, B, and C.


NOTE: ECM connectors A, B, and C have symbols (A=□, B=△, C=○) embossed on them for identification.


2.

Install the ECM (D).


3.

Install the cover (A).


2. Battery Terminal - Reconnection


NOTE: If the battery performs abnormally, test the battery.


1.

Clean the battery terminals.


2.

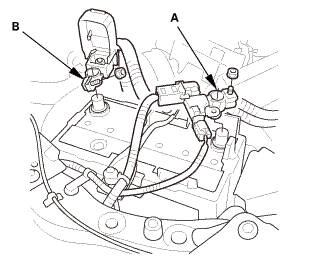
Connect the positive cable (A) to the battery.


NOTE: Always connect the positive side first.


3.

Connect the negative cable and battery sensor (B) to the battery.


4.

Apply multipurpose grease to the terminals to prevent corrosion.


3. HDS DLC - Connection


1.

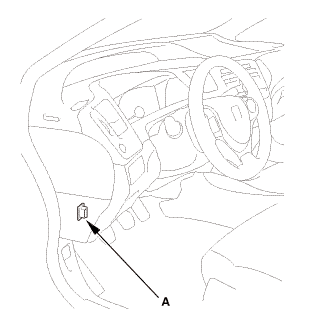
Connect the HDS to the data link connector (DLC) (A) located under the driver's side of the dashboard.


2.

Turn the ignition switch to ON (II).


3.

Make sure the HDS communicates with the vehicle. If it does not communicate, go to the DLC circuit troubleshooting.


4. VIN Registration

1.

Turn the ignition switch to ON (II).


2.

Manually input the VIN to the ECM/PCM with the HDS.


NOTE: DTC P0630 VIN Not Programmed or Mismatch may be stored because the VIN has not been programmed into the ECM/PCM; ignore it, and continue this procedure.


5. Immobilizer Key Registration - Programming Control Unit

1.

Select the IMMOBI SYSTEM with the HDS.


2.

Enter the immobilizer code using the ECM/PCM replacement procedure in the HDS; it allows you to start the engine.


6. ECM/PCM - Update

1.

Select the INSPECTION MENU with the HDS.


2.

Select the ETCS TEST, then select the TP POSITION CHECK, and follow the HDS screen prompts.


NOTE: If the TP POSITION CHECK indicates FAILED, continue this procedure.


3.

Exit the HDS diagnostic system, then select the update mode, and follow the screen prompts to update the ECM/PCM.


4.

If the software in the ECM/PCM is the latest, disconnect the updating tool from the DLC, then go back to the procedure that you were doing. If the software in the ECM/PCM is not the latest, follow the instructions on the screen. If prompted to choose the PGM-FI system or the A/T system, make sure you update both.


NOTE: If the ECM/PCM update system requires you to cool the ECM/PCM, follow the instructions on screen. If you have a problem during the update procedure (programming takes over 15 minutes, status bar goes over 100 %, D or immobilizer indicator flashes, HDS tablet freezes, etc.), follow these steps to minimize the chance of damaging the ECM/PCM.

Leave the ignition switch in ON (II).

Connect a jumper battery (do not connect a battery charger).

Shut down the updating tool.

Disconnect the updating tool from the DLC.

Reboot the updating tool.

Reconnect the updating tool to the DLC, and try the update procedure again.


5.

If the TP POSITION CHECK failed in step 2, clean the throttle body.


7. ECM/PCM - Reset

1.

Reset the ECM/PCM with the HDS while the engine is stopped.


2.

Turn the ignition switch to LOCK (0).


3.

Turn the ignition switch to ON (II) and wait 30 seconds.


8. Warm Up The Engine

Start the engine. Hold the engine speed at 3,000 rpm without load (A/T in P or N, M/T in neutral) until the radiator fan comes on, then let it idle.


9. ECM/PCM - Idle Learn

1.

Let the engine idle for about 5 minutes with the throttle fully closed.


NOTE: If the radiator fan comes on, do not include its running time in the 5 minutes.


Emissions
...

FTT Sensor Removal and Installation (R18A9)
310109 1. Vehicle Lift 1. Raise the vehicle on a lift, and make sure it is securely supported. ...

See also:

Honda Civic Owners Manual. Adjusting the Shoulder Anchor
The front seats have adjustable shoulder anchors to accommodate taller and shorter occupants. 1. Move the anchor up and down while pulling the release outward. 2. Position the anchor so that the belt rests across the center of your chest and over your shoulder. Adjusting the Shoulder ...

© 2016-2024 Copyright www.hocivic.com

0.0082