Honda Civic Service Manual: Front Seat Belt Removal and Installation - Driver's Seat (2-door)

Removal
| 1. |
Battery Terminal (SRS) - Disconnection |
|
|
|
1.
|
Make sure the ignition switch is in LOCK (0).
|
|
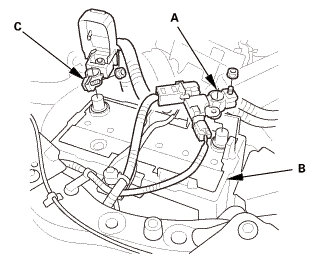
2.
|
Disconnect and isolate the negative cable and battery sensor
(A) from the battery (B).
|
|
NOTE: Always disconnect the negative side first.
|
|
3.
|
Disconnect the positive cable (C) from the battery.
|
|
4.
|
Wait at least 3 minutes before starting work.
|
|
| 2. |
Front Seat Belt Lower Anchor Bolt - Driver's Side |
|
|
|
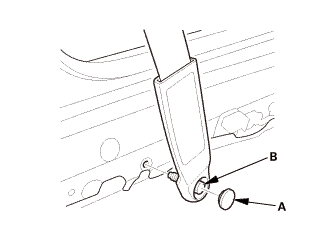
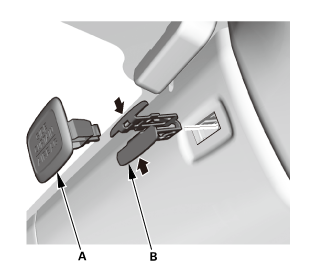
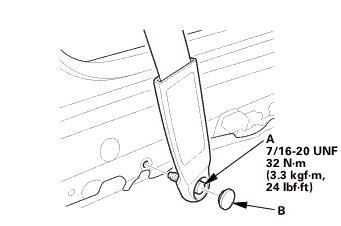
1.
|
Remove the lower anchor cap (A).
|
|
2.
|
Remove the lower anchor bolt (B).
|
|
|

|
|
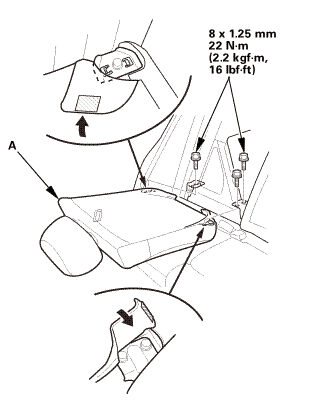
1.
|
Remove the anchor cover (A).
|
|
|

|
|
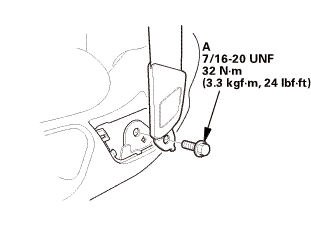
2.
|
Remove the lower anchor bolt (A).
|
|
| 3. |
Front Door Sill Trim - 2-Door |
|

|
|
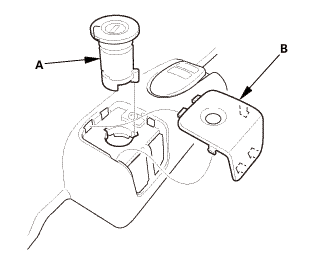
2.
|
Remove the opener lock cylinder (B).
|
|
|
|
|
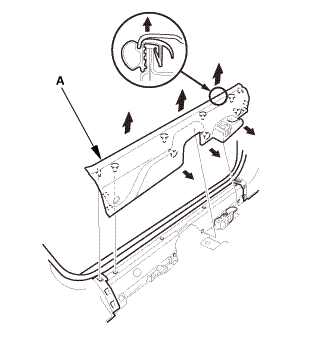
4.
|
Remove the front door sill trim (A).
|
|
|
|
|
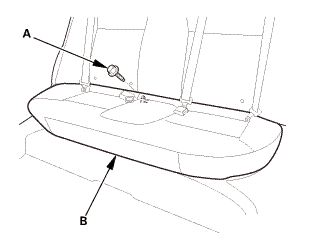
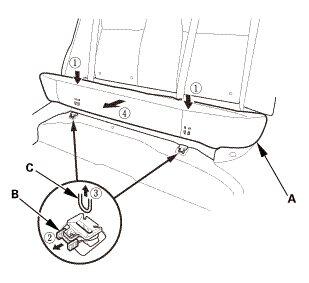
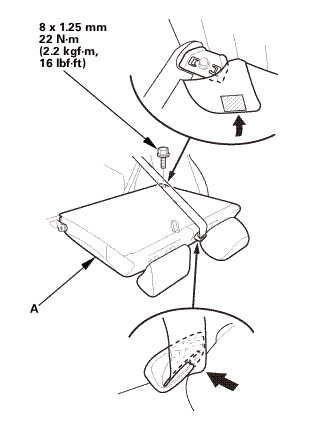
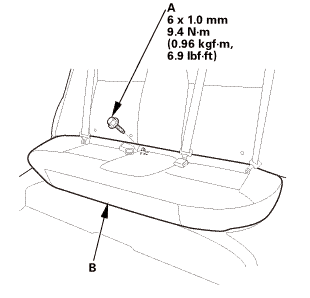
1.
|
Remove the bolt (A) securing the rear seat cushion (B).
|
|
|
|
|
2.
|
While pushing down the rear seat cushion (A), pull the seat hook
handles (B) to release the hooks (C).
|
|
3.
|
Remove the rear seat cushion.
|
|
| 5. |
Rear Seat-Back - Fold Down |
|

|
|
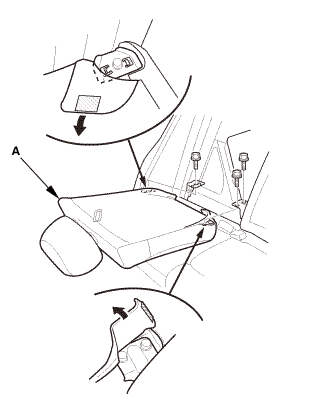
1.
|
Remove the rear seat-back (A).
|
|
| 6. |
Right Rear Seat-Back - Split Fold Down |
|
|
|
1.
|
Remove the right rear seat-back (A).
|
|
| 7. |
Center Pivot Bracket - Split Fold Down |
|

|
|
1.
|
Remove the center pivot bracket (A).
|
|
2.
|
If necessary, remove the bushing (B).
|
|
| 8. |
Left Rear Seat-Back - Split Fold Down |
|
|
|
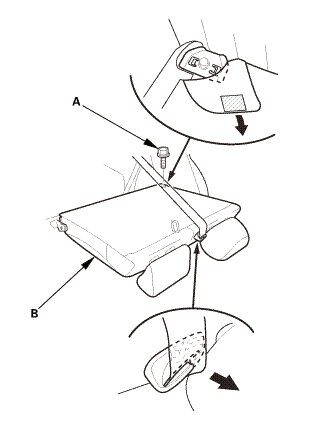
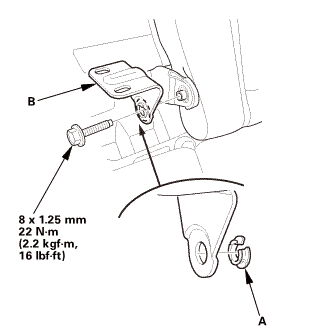
1.
|
Remove the bolt (A) securing the left rear seat-back (B).
|
|
|
|
|
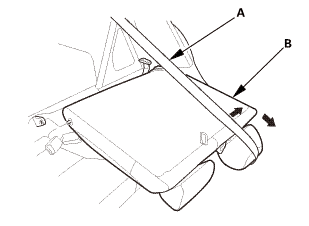
2.
|
Extend the center seat belt (A), then remove the left rear seat-back
(B).
|
|
| 9. |
Both Quarter Pillar Trims |
|
|
|
1.
|
Remove the cap (A) and the clip (B).
|
|
2.
|
The left side is shown; repeat on the right side.
|
|
|

|
|
3.
|
Lower the coat hanger hook (A), then remove the screw (B).
|
|
4.
|
The left side is shown; repeat on the right side.
|
|
|
|
|
5.
|
Pull out the quarter pillar trim (A) to release the clips.
|
|
6.
|
Remove the quarter pillar trim.
|
|
NOTE: The rear clip (B) will stay in the body.
|
|
7.
|
The left side is shown; repeat on the right side.
|
|
|

|
|
8.
|
Remove the rear clip (A).
|
|
9.
|
The left side is shown; repeat on the right side.
|
|
|

|
|
1.
|
Fold down the seat-back(s).
|
|
2.
|
From the trunk compartment, disconnect the connector (A).
|
|
|

|
|
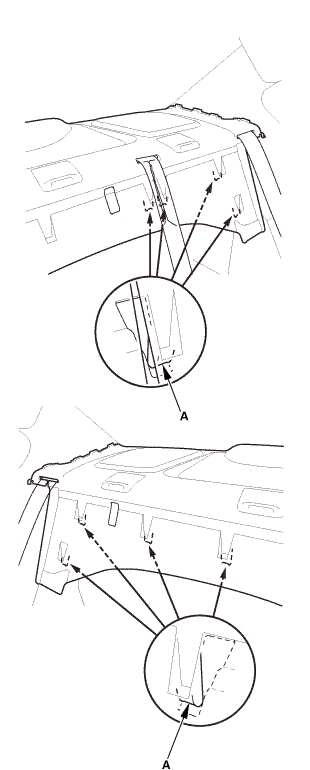
3.
|
From the trunk compartment, detach the clips (A).
|
|
|
|
|
4.
|
Release the hooks (A).
|
|
|

|
|
5.
|
Pull out both rear seat belts (A) and the rear center seat belt
(B) through the slits in the rear shelf trim (C), then remove the
rear shelf trim.
|
|
|

|
|
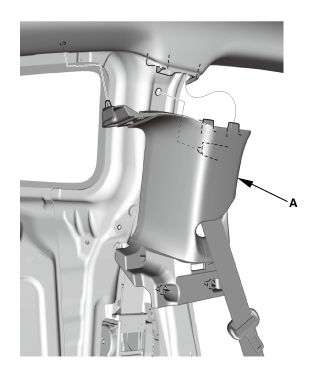
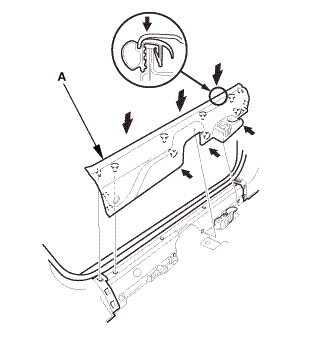
1.
|
Remove the rear side trim panel (A).
|
|
|
|
|
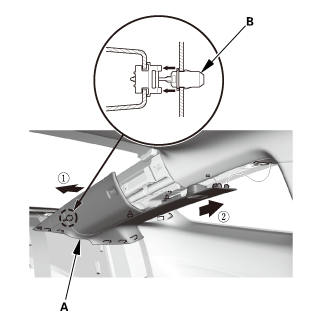
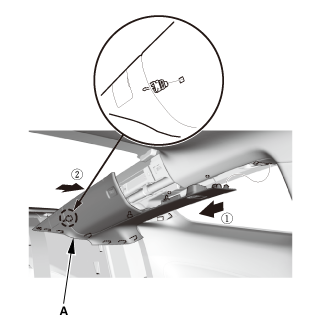
1.
|
Remove the B-pillar upper trim (A).
|
|
|
|
|
2.
|
Pass the front seat belt lower anchor (A) out through the hole
in the B-pillar upper trim (B), then remove the trim.
|
|
| 13. |
Front Seat Belt Upper Anchor Bolt - Driver's Side |
|
2-door

4-door
|
|
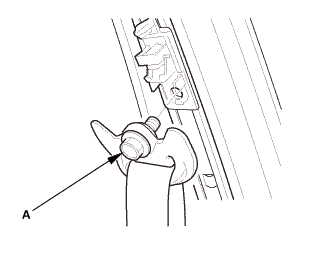
1.
|
Remove the upper anchor bolt (A).
|
|
| 14. |
Front Seat Belt Retractor - Driver's Side (2-Door) |
|

|
|
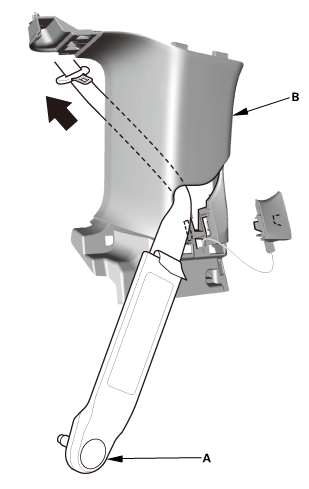
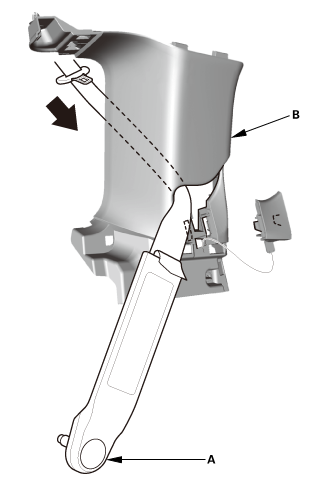
1.
|
Remove the seat belt guide (A).
|
|
|

|
|
2.
|
Remove the seat belt retractor (A).
|
|
3.
|
Disconnect the connector.
|
|

Installation
| 1. |
Front Seat Belt Retractor - Driver's Side (2-Door) |
|
 mm mm
|
|
1.
|
Connect the connector.
|
|
2.
|
Install the seat belt retractor (A).
|
|
|

|
|
3.
|
Install the seat belt guide (A).
|
|
| 2. |
Front Seat Belt Upper Anchor Bolt - Driver's Side |
|

|
|
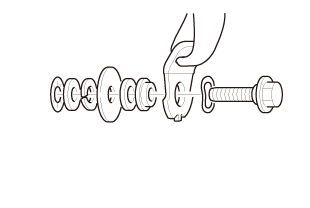
1.
|
Assemble the washer, the collar, and the bushing on the upper
anchor bolt as shown.
|
|
NOTE: Apply medium strength liquid thread lock to the upper anchor
bolt before reinstallation.
|
|
|
2-door
 7i1iza:2inm,mm 7i1iza:2inm,mm
4-door

|
|
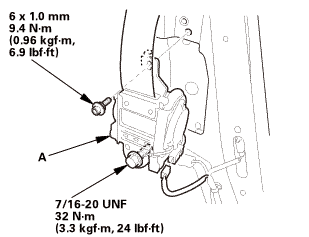
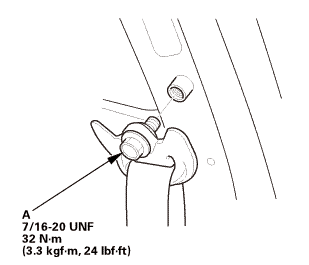
2.
|
Install the upper anchor bolt (A).
|
|
|
|
|
1.
|
Pass the front seat belt lower anchor (A) in through the hole
in the B-pillar upper trim (B).
|
|
|

|
|
2.
|
Install the B-pillar upper trim (A).
|
|
|
|
|
1.
|
Install the rear side trim panel (A).
|
|
|

|
|
1.
|
Slip the rear seat belts (A) and the rear center seat belt (B)
through the slits in the rear shelf trim (C).
|
|
|
|
|
2.
|
Install the hooks (A).
|
|
|

|
|
3.
|
Install the clips (A).
|
|
|
|
|
4.
|
From the trunk compartment, connect the connector (A).
|
|
5.
|
Raise the seat-back(s).
|
|
| 6. |
Both Quarter Pillar Trims |
|

|
|
1.
|
Install the new rear clip (A) to the quarter pillar trim (B).
|
|
|
|
|
2.
|
Fit the clips into the holes in the quarter pillar.
|
|
3.
|
Lightly push the quarter pillar trim (A) into place, then install
the trim.
|
|
NOTE:
|
|

|
Make sure the side curtain airbag is not tucked
under the clips or the ribs.
|
|
|
|
Do not push too hard on the quarter pillar trim.
If you push too hard, the clip will be damaged,
and it will not hold the trim properly.
|
|
|
|
Gently tug on the quarter pillar trim to verify
that all clips are securely fastened.
|
|
|
|
|

|
|
4.
|
Install the screw (A).
|
|
|

|
|
5.
|
Install the clip (A) and the cap (B).
|
|
| 7. |
Left Rear Seat-Back - Split Fold Down |
|

|
|
1.
|
Extend the center seat belt (A), then install the pivot shaft
(B) to the center pivot bracket (C).
|
|
|
|
|
2.
|
Install the left rear seat-back (A).
|
|
| 8. |
Center Pivot Bracket - Split Fold Down |
|
|
|
1.
|
If necessary, install the bushing (A).
|
|
2.
|
Install the center pivot bracket (B).
|
|
| 9. |
Right Rear Seat-Back - Split Fold Down |
|
|
|
1.
|
Install the right rear seat-back (A).
|
|
| 10. |
Rear Seat-Back - Fold Down |
|

|
|
1.
|
Install the rear seat-back (A).
|
|
|

|
|
1.
|
Install the hooks (A) to the rear seat cushion clips (B).
|
|
|
|
|
2.
|
Install the bolt (A) securing the rear seat cushion (B).
|
|
| 12. |
Front Door Sill Trim - 2-Door |
|
|
|
1.
|
Install the front door sill trim (A).
|
|
|

|
|
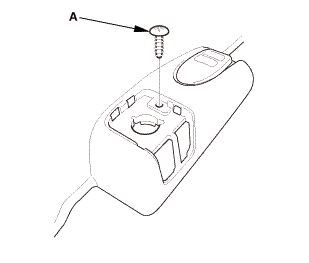
2.
|
Install the screw (A).
|
|
|
|
|
3.
|
Install the opener lock cylinder (A).
|
|
| 13. |
Front Seat Belt Lower Anchor Bolt - Driver's Side |
|
|
|
1.
|
Assemble the washer, the collar, and the bushing on the lower
anchor bolt as shown.
|
|
NOTE: Apply medium strength liquid thread lock to the lower anchor
bolt before reinstallation.
|
|
|
|
|
2.
|
Install the lower anchor bolt (A).
|
|
3.
|
Install the anchor cover (B).
|
|
|
 nmimm nmimm
|
|
1.
|
Install the lower anchor bolt (A).
|
|
|

|
|
2.
|
Install the anchor cover (A).
|
|
| 14. |
Battery Terminal (SRS) - Reconnection |
|
 (o.2ao.sam. (o.2ao.sam.
|
|
NOTE: If the battery performs abnormally, test the battery.
|
|
1.
|
Clean the battery terminals.
|
|
2.
|
Connect the positive cable (A) to the battery (B).
|
|
NOTE: Always connect the positive side first.
|
|
3.
|
Connect the negative cable and battery sensor (C) to the battery.
|
|
4.
|
Apply multipurpose grease to the terminals to prevent corrosion.
|
|
Removal
1.
Battery Terminal (SRS) - Disconnection
1.
Make sure the ignition switch is in LOCK (0).
...
 Primary
 Front Seat Belt Removal and Installation - Passenger's Seat (2-door)